
这是我参与「第五届青训营 」伴学笔记创作活动的第 1 天
性能优化指南从slice,map,字符串拼接,空结构体,atomic五个方面总结性能优化知识。
SliceSlice预分配内存
原理:
-
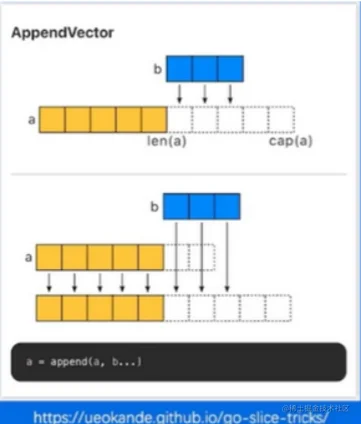
切片本质是一个数组片段的描述
- 包括数组指针
- 片段的长度
- 片段的容量(不改变内存分配情况下的最大长度)
-
切片操作不会复制切片指向的元素(不包括append)
-
创建一个新的切片会复用原来切片的底层数组
在runtime包中有slice定义:
type slice struct {
	array unsafe.Pointer
	len   int
	cap   int
}
复制代码
实验:
测试预分配和未预分配内存时,程序的运行效率和内存使用情况
package slice

import "testing"

func noPreAlloc(n int) {
	data := make([]int, 0)
	for i := 0; i < n; i++ {
		data = append(data, i)
	}
}

func preAlloc(n int) {
	data := make([]int, 0, n)
	for i := 0; i < n; i++ {
		data = append(data, i)
	}
}

func benchmarkNoPreAlloc(n int, b *testing.B) {
	for i := 0; i < b.N; i++ {
		noPreAlloc(n)
	}
}

func benchmarkPreAlloc(n int, b *testing.B) {
	for i := 0; i < b.N; i++ {
		preAlloc(n)
	}
}

//100和1000分别表示切片的容量
func BenchmarkNoPreAlloc100(b *testing.B)  { benchmarkNoPreAlloc(100, b) }
func BenchmarkNoPreAlloc1000(b *testing.B) { benchmarkNoPreAlloc(1000, b) }
func BenchmarkPreAlloc100(b *testing.B)    { benchmarkPreAlloc(100, b) }
func BenchmarkPreAlloc1000(b *testing.B)   { benchmarkPreAlloc(1000, b) }
复制代码
在当前目录下使用命令
go test -bench . -benchmem

输出解释: 在64位机器上,1个int占8Byte,100个int占800Byte,但是需要申请2的幂个int的空间,即128*8Byte=896Byte,所以第三行输出一次op申请896Byte空间
如果不使用预分配的话,申请的内存空间为(0+1+2+4+8+16+32+64+128) * 8Byte=255* 8Byte=2040Byte,8次分配也就是从1增加到128分配了8次内存
Slice大内存未释放
原理:
-
在已有切片基础上创建切片,不会创建新的底层数组
-
场景
- 原切片较大,代码在原切片的基础上新建小切片
- 原底层数组在内存中有引用,得不到释放
-
可使用copy替代re-slice
实验:
package slice

import (
	"math/rand"
	"runtime"
	"testing"
	"time"
)

func generateWithCap(n int) []int {
	rand.Seed(time.Now().UnixNano())
	nums := make([]int, 0, n)
	for i := 0; i < n; i++ {
		nums = append(nums, rand.Int())
	}
	return nums
}

func GetLastBySlice(origin []int) []int {
	return origin[len(origin)-2:]
}

func GetLastByCopy(origin []int) []int {
	ret := make([]int, 2)
	copy(ret, origin[len(origin)-2:])
	return ret
}

func testGetLast(t *testing.T, f func([]int) []int) {
	ret := make([][]int, 0)
	for i := 0; i < 100; i++ {
		origin := generateWithCap(128 * 1024) // 1M
		ret = append(ret, f(origin))
	}
	printMem(t)
	_ = ret
}

func printMem(t *testing.T) {
	t.Helper()
	var rtm runtime.MemStats
	runtime.ReadMemStats(&rtm)
	t.Logf("%.2f MB", float64(rtm.Alloc)/1024./1024.)
}

func TestLastBySlice(t *testing.T) {
	testGetLast(t, GetLastBySlice)
}

func TestLastByCopy(t *testing.T) {
	testGetLast(t, GetLastByCopy)
}
复制代码
在当前目录下使用命令
go test . -v

输出解释:根据原理部分,每次调用testGetLast(t, GetLastBySlice)函数都会向内存中申请1M空间,并且得不到释放,调用100次最终会占用100M空间。而每次调用testGetLast(t, GetLastByCopy)函数也会向内存申请1M空间,但是这1M空间在内存中无引用时会被垃圾回收器自动释放掉,每次只会有2*8=16B的空间占用,调用100次后占用的内存空间为1600B,而代码输出的是3.22MB,比1600B大不少,是因为部分空间还没有被垃圾回收器释放掉,如果显式调用runtime.GC(),内存占用会更少:
func testGetLast(t *testing.T, f func([]int) []int) {
	ret := make([][]int, 0)
	for i := 0; i < 100; i++ {
		origin := generateWithCap(128 * 1024) // 1M
		ret = append(ret, f(origin))
		runtime.GC()
	}
	printMem(t)
	_ = ret
}
复制代码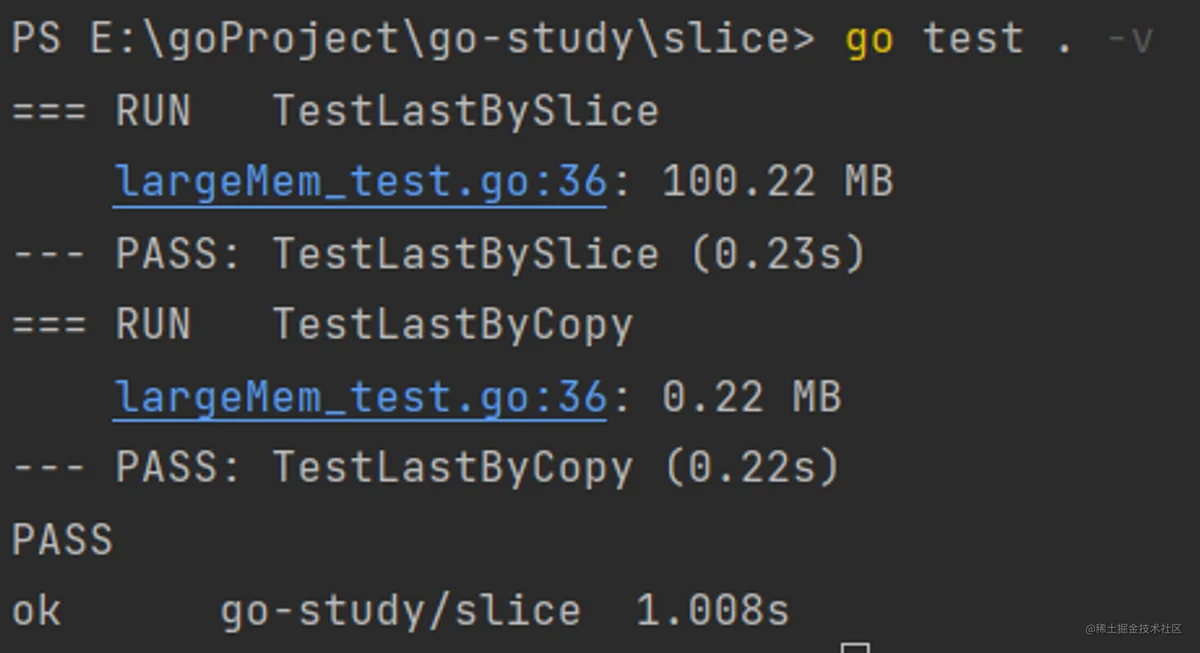
Map预分配内存
原理:
- 不断向map中添加元素的操作会触发map的扩容
- 提前分配好空间可以减少内存拷贝和Rehash的消耗
实验:
package maptest

import (
	"testing"
)

func noPreAlloc(n int) {
	data := make(map[int]int)
	for i := 0; i < n; i++ {
		data[i] = 1
	}
}

func preAlloc(n int) {
	data := make(map[int]int, n)
	for i := 0; i < n; i++ {
		data[i] = 1
	}
}

func benchmarkNoPreAlloc(n int, b *testing.B) {
	for i := 0; i < b.N; i++ {
		noPreAlloc(n)
	}
}

func benchmarkPreAlloc(n int, b *testing.B) {
	for i := 0; i < b.N; i++ {
		preAlloc(n)
	}
}

//1000和10000分别表示map的容量
func BenchmarkNoPreAlloc1000(b *testing.B)  { benchmarkNoPreAlloc(1000, b) }
func BenchmarkNoPreAlloc10000(b *testing.B) { benchmarkNoPreAlloc(10000, b) }
func BenchmarkPreAlloc1000(b *testing.B)    { benchmarkPreAlloc(1000, b) }
func BenchmarkPreAlloc10000(b *testing.B)   { benchmarkPreAlloc(10000, b) }
复制代码
在当前目录下使用命令
go test -bench . -benchmem

从输出中可以看出,预分配内存空间可以减少每次操作的内存分配次数,最终可以减少大概一半的调用时间
String拼接字符串
原理:
- 使用+拼接性能最差,strings.Builder,bytes.Buffer相近,strings.Builder更快
- 字符串在golang中是不可变类型,占用内存大小是固定的
- 使用+每次都会重新分配内存
- strings,Builder,bytes.Buffer底层都是[]byte数组,根据内存扩容策略,不需要每次拼接重新分配内存
在最后转化成字符串时,bytes.Buffer和strings.Builder的区别:
bytes.Buffer
// To build strings more efficiently, see the strings.Builder type.
func (b *Buffer) String() string {
	if b == nil {
		// Special case, useful in debugging.
		return "<nil>"
	}
	return string(b.buf[b.off:])
}
复制代码
strings.Builder
// String returns the accumulated string.
func (b *Builder) String() string {
	return *(*string)(unsafe.Pointer(&b.buf))
}
复制代码
实验:
package stringtest

import (
	"bytes"
	"fmt"
	"math/rand"
	"strings"
	"testing"
)

const letterBytes = "abcdefghijklmnopqrstuvwxyzABCDEFGHIJKLMNOPQRSTUVWXYZ"

func randomString(n int) string {
	b := make([]byte, n)
	for i := range b {
		b[i] = letterBytes[rand.Intn(len(letterBytes))]
	}
	return string(b)
}

func plusConcat(n int, str string) string {
	s := ""
	for i := 0; i < n; i++ {
		s += str
	}
	return s
}

func sprintfConcat(n int, str string) string {
	s := ""
	for i := 0; i < n; i++ {
		s = fmt.Sprintf("%s%s", s, str)
	}
	return s
}

func builderConcat(n int, str string) string {
	var builder strings.Builder
	for i := 0; i < n; i++ {
		builder.WriteString(str)
	}
	return builder.String()
}

func bufferConcat(n int, s string) string {
	buf := new(bytes.Buffer)
	for i := 0; i < n; i++ {
		buf.WriteString(s)
	}
	return buf.String()
}

func byteConcat(n int, str string) string {
	buf := make([]byte, 0)
	for i := 0; i < n; i++ {
		buf = append(buf, str...)
	}
	return string(buf)
}

func preByteConcat(n int, str string) string {
	buf := make([]byte, 0, n*len(str))
	for i := 0; i < n; i++ {
		buf = append(buf, str...)
	}
	return string(buf)
}

func benchmark(b *testing.B, f func(int, string) string) {
	var str = randomString(10)
	for i := 0; i < b.N; i++ {
		f(10000, str)
	}
}

func BenchmarkPlusConcat(b *testing.B)    { benchmark(b, plusConcat) }
func BenchmarkSprintfConcat(b *testing.B) { benchmark(b, sprintfConcat) }
func BenchmarkBuilderConcat(b *testing.B) { benchmark(b, builderConcat) }
func BenchmarkBufferConcat(b *testing.B)  { benchmark(b, bufferConcat) }
func BenchmarkByteConcat(b *testing.B)    { benchmark(b, byteConcat) }
func BenchmarkPreByteConcat(b *testing.B) { benchmark(b, preByteConcat) }
复制代码
运行命令:
go test -bench="Concat$" -benchmem .

从结果来看,除了预分配内存,strings.Builder和bytes.Buffer效率相当,strings.Builder也支持预分配内存:
func builderConcat(n int, str string) string {
	var builder strings.Builder
	builder.Grow(n * len(str))
	for i := 0; i < n; i++ {
		builder.WriteString(str)
	}
	return builder.String()
}
复制代码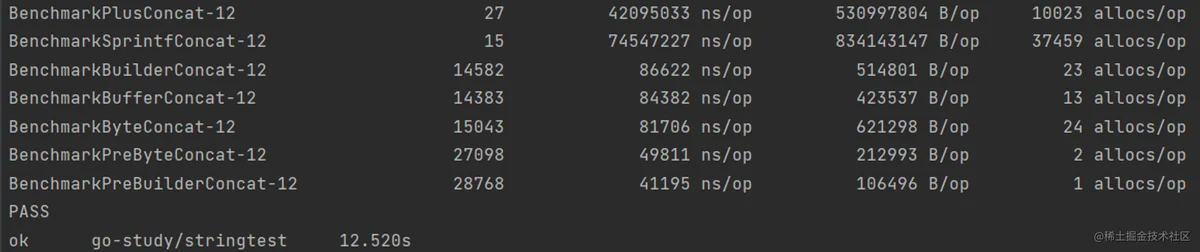
[]byte[]byte使用空结构体节约内存
-
空结构体struct{}实例不占用任何的内存空间
-
可作为各种场景下的占位符使用
- 节省资源
- 空结构体本身具备很强的语义,即这里不需要任何值,仅作为占位符
- 实现Set
原理:
- 锁的实现是通过操作系统来实现的,属于系统调用
- atomic操作是通过硬件实现的,效率比锁高
- sync.Mutex应该用来保护一段逻辑,不仅仅用于保护一个变量
- 对于非数值操作,可以使用atomic.Value,能承载一个interface{}
实验:
package atomictest

import (
	"sync"
	"sync/atomic"
	"testing"
)

type atomicCounter struct {
	i int32
}

func AtomicAddOne(c *atomicCounter) {
	atomic.AddInt32(&c.i, 1)
}

type mutexCounter struct {
	i int32
	m sync.Mutex
}

func MutexAddOne(c *mutexCounter) {
	c.m.Lock()
	c.i++
	c.m.Unlock()
}

func BenchmarkAtomicAddOne(b *testing.B) {
	var c atomicCounter
	for i := 0; i < b.N; i++ {
		AtomicAddOne(&c)
	}
}

func BenchmarkMutexAddOne(b *testing.B) {
	var c mutexCounter
	for i := 0; i < b.N; i++ {
		MutexAddOne(&c)
	}
}
复制代码
运行命令
go test -bench . -benchmem
