
前言
学无止境,无止境学。大家好,我是张大鹏,之前在抖音有5万多粉丝,不过现在不拍视频,专心写公众号了。笔者目前是高级Python工程师,之前是全栈工程师,主要擅长Golang和Python开发,对于Java,Vue,React也有一些研究。工作之余,喜欢学习和分享,希望能够通过此公众号"张大鹏520",将自己学到的东西分享给大家,和大家一起交流,一起成长,一起进步。
今天要给大家分享的是《前后端分离电商管理系统实战07 实现并完善用户登录功能》,这是一个系列的教程,从零基础到项目实战。在本教程中,我会给大家介绍如何使用vue3实现用户登录的完整功能。主要包括以下知识点:
创建登录页面
登录页面布局
添加登录页面元素
美化登录页面
引入图标
登录输入框添加图标
用户登录表单校验
整合axios发送请求
引入cookie
配置axios拦截器
常用工具库封装
使用vuex管理用户信息
登录权限校验
完善登录功能
实现退出登录的功能
全局loading进度条实现
实现动态页面标题
如果大家需要本教程的PDF电子书或者完整的源码,可以在文末找到获取方式哈。
创建登录页面
创建pages/login.vue,作为我们的登录页面:
<template>
    <div>
        登录
    </div>
</template>
在router/index.js中配置登录的路由:
//引入依赖
import{createRouter,createWebHashHistory}from"vue-router";
//引入页面
importIndexfrom"@/pages/index.vue";
importNotFoundfrom"@/pages/404.vue";
importLoginfrom"@/pages/login.vue";

//路由数组
constroutes=[
//首页
{path:"/",name:"Index",component:Index},
//404错误页面
{path:"/:pathMatch(.*)*",name:"NotFound",component:NotFound},
//登录页面
{path:"/login",name:"Login",component:Login},
];

//创建路由
constrouter=createRouter({
history:createWebHashHistory(),
routes,
});

//导出路由
exportdefaultrouter;
浏览器访问:http://localhost:5173/#/login
登录页面布局
使用element-plus和windicss配合,我们可以轻松的实现登录界面的左右布局:
<template>
    <div>
        <el-row class="min-h-screen bg-indigo-500">
            <!-- 左侧 -->
            <el-col :span="16">
                左
            </el-col>

            <!-- 右侧 -->
            <el-col :span="8" class="bg-light-50">
                右
            </el-col>
        </el-row>
    </div>
</template>
此时的页面显示效果如下:
image-20221112131719762这样,我们就实现了一个基本的左右布局样式。
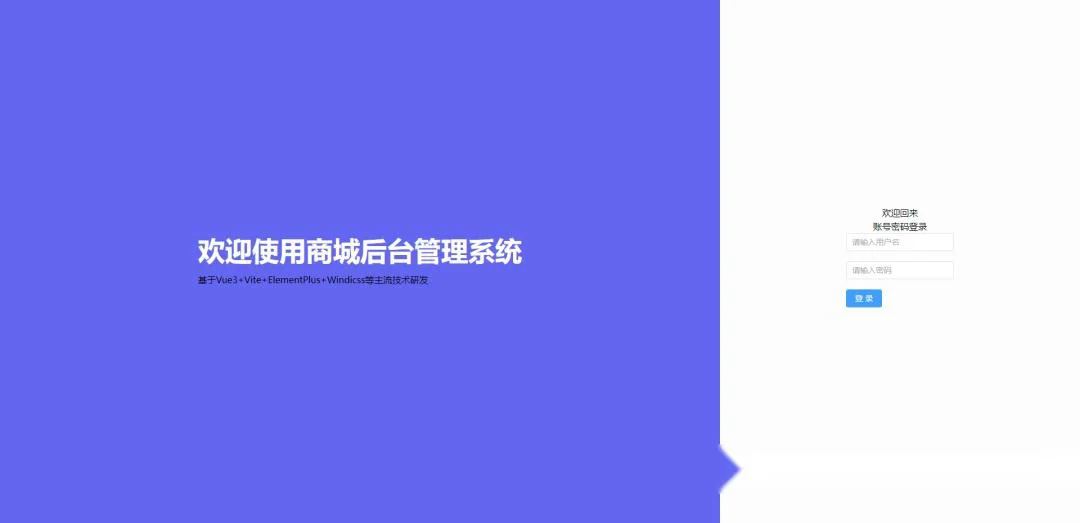
添加登录页面元素
修改pages/login.vue,我们添加登录需要的基本元素:
<template>
    <div>
        <el-row class="min-h-screen bg-indigo-500">
            <!-- 左侧 -->
            <el-col :span="16" class="flex items-center justify-center">
                <div>
                    <h1 class="font-bold mb-4 text-5xl text-light-50">欢迎使用商城后台管理系统</h1>
                    <p>基于Vue3+Vite+ElementPlus+Windicss等主流技术研发</p>
                </div>
            </el-col>

            <!-- 右侧 -->
            <el-col :span="8" class="flex flex-col bg-light-50 items-center justify-center">
                <h2>欢迎回来</h2>
                <div>
                    <span></span>
                    <span>账号密码登录</span>
                    <span></span>
                </div>
                <el-form :model="form">
                    <el-form-item>
                        <el-input v-model="form.username" placeholder="请输入用户名" />
                    </el-form-item>
                    <el-form-item>
                        <el-input v-model="form.password" placeholder="请输入密码" />
                    </el-form-item>
                    <el-form-item>
                        <el-button type="primary" @click="onSubmit">登 录</el-button>
                    </el-form-item>
                </el-form>
            </el-col>
        </el-row>
    </div>
</template>

<script setup>
import { reactive } from 'vue'

const form = reactive({
    username: '',
    password: '',
})

const onSubmit = () => {
    console.log('submit!')
}
</script>
修改以后,整个页面的布局基本如下:


美化登录界面
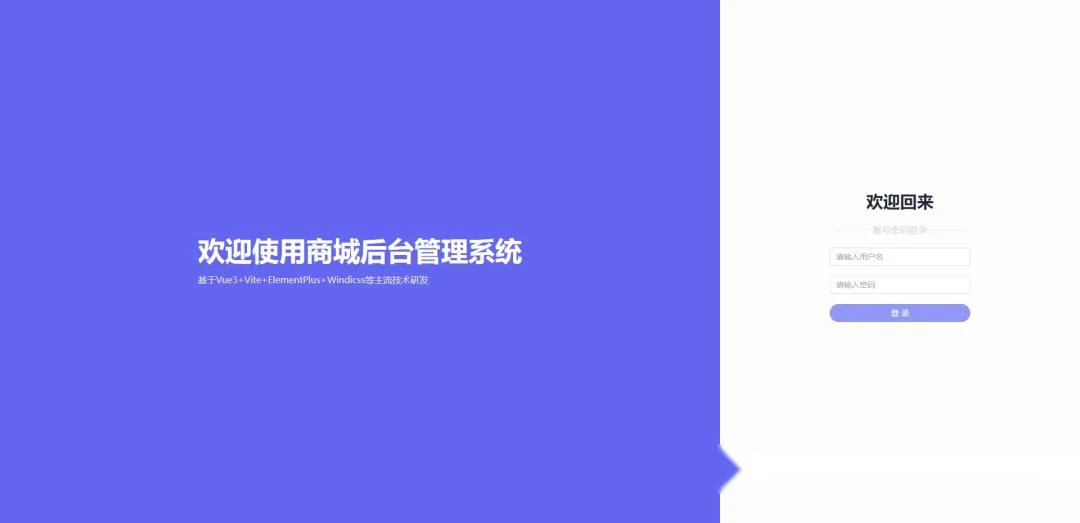
接着,我们给登录界面的元素添加一些样式,继续修改pages/login.vue,添加样式:
<template>
    <div>
        <el-row class="min-h-screen bg-indigo-500">
            <!-- 左侧 -->
            <el-col :span="16" class="flex items-center justify-center">
                <div>
                    <h1 class="font-bold mb-4 text-5xl text-light-50">欢迎使用商城后台管理系统</h1>
                    <p class="text-base text-gray-200">基于Vue3+Vite+ElementPlus+Windicss等主流技术研发</p>
                </div>
            </el-col>

            <!-- 右侧 -->
            <el-col :span="8" class="flex flex-col bg-light-50 items-center justify-center">
                <h2 class="font-bold text-3xl text-gray-800">欢迎回来</h2>
                <div class="flex space-x-1 my-5 text-gray-300 items-center justify-center">
                    <span class="bg-gray-200 h-[1px] w-16"></span>
                    <span>账号密码登录</span>
                    <span class="bg-gray-200 h-[1px] w-16"></span>
                </div>

                <!-- 表单 -->
                <el-form :model="form" class="w-[250px]">
                    <el-form-item>
                        <el-input v-model="form.username" placeholder="请输入用户名" />
                    </el-form-item>
                    <el-form-item>
                        <el-input v-model="form.password" placeholder="请输入密码" />
                    </el-form-item>
                    <el-form-item>
                        <el-button class="w-[250px]" type="primary" @click="onSubmit" color="#626aef" round>登 录
                        </el-button>
                    </el-form-item>
                </el-form>
            </el-col>
        </el-row>
    </div>
</template>

<script setup>
import { reactive } from 'vue'

const form = reactive({
    username: '',
    password: '',
})

const onSubmit = () => {
    console.log('submit!')
}
</script>
这里需要对这里面的一些样式做一些讲解,参考文档:https://cn.windicss.org/utilities/general/typography.html
flex items-center justify-centerbg-gray-200 h-[1px] w-16w-[250px]整个页面美化后如下:

引入图标
安装element plus的图标:
#选择一个你喜欢的包管理器

#NPM
$npminstall@element-plus/icons-vue
#Yarn
$yarnadd@element-plus/icons-vue
#pnpm
$pnpminstall@element-plus/icons-vue
接着修改main.js,引入element-plus的图标:
import{createApp}from"vue";
importAppfrom"./App.vue";
importElementPlusfrom"element-plus";
import"element-plus/dist/index.css";
importrouterfrom"./router";
import*asElementPlusIconsVuefrom"@element-plus/icons-vue";

constapp=createApp(App);

app.use(router);
app.use(ElementPlus);

//引入element-plus的图标
for(const[key,component]ofObject.entries(ElementPlusIconsVue)){
app.component(key,component);
}

//注意,位置不是在顶部
import"virtual:windi.css";

app.mount("#app");
登录输入框添加图标
参考文档,我们在登录页面的输入框中添加图标。
修改pages/login.vue,添加图标:
<template>
    <div>
        <el-row class="min-h-screen bg-indigo-500">
            <!-- 左侧 -->
            <el-col :lg="16" :md="12" class="flex items-center justify-center">
                <div>
                    <h1 class="font-bold mb-4 text-5xl text-light-50">欢迎使用商城后台管理系统</h1>
                    <p class="text-base text-gray-200">基于Vue3+Vite+ElementPlus+Windicss等主流技术研发</p>
                </div>
            </el-col>

            <!-- 右侧 -->
            <el-col :lg="8" :md="12" class="flex flex-col bg-light-50 items-center justify-center">
                <h2 class="font-bold text-3xl text-gray-800">欢迎回来</h2>
                <div class="flex space-x-1 my-5 text-gray-300 items-center justify-center">
                    <span class="bg-gray-200 h-[1px] w-16"></span>
                    <span>账号密码登录</span>
                    <span class="bg-gray-200 h-[1px] w-16"></span>
                </div>

                <!-- 表单 -->
                <el-form :model="form" class="w-[250px]">
                    <el-form-item>
                        <el-input v-model="form.username" placeholder="请输入用户名">
                            <!-- 使用前缀插槽插入element-plus的图标 -->
                            <template #prefix>
                                <el-icon class="el-input__icon">
                                    <User />
                                </el-icon>
                            </template>
                        </el-input>
                    </el-form-item>
                    <el-form-item>
                        <el-input v-model="form.password" placeholder="请输入密码">
                            <template #prefix>
                                <el-icon class="el-input__icon">
                                    <Lock />
                                </el-icon>
                            </template>
                        </el-input>
                    </el-form-item>
                    <el-form-item>
                        <el-button class="w-[250px]" type="primary" @click="onSubmit" color="#626aef" round>登 录
                        </el-button>
                    </el-form-item>
                </el-form>
            </el-col>
        </el-row>
    </div>
</template>

<script setup>
import { reactive } from 'vue'
// 引入element-plus的图标
import { User, Lock } from '@element-plus/icons-vue'
const form = reactive({
    username: '',
    password: '',
})

const onSubmit = () => {
    console.log('submit!')
}
</script>
添加图标以后的登录界面效果如下:

实际上,咱们在开始配置的时候进行了全局引入,所以图标使用的时候,不再显式的引入也是可以的,所以登录界面可以改写为如下代码:
<template>
    <div>
        <el-row class="min-h-screen bg-indigo-500">
            <!-- 左侧 -->
            <el-col :lg="16" :md="12" class="flex items-center justify-center">
                <div>
                    <h1 class="font-bold mb-4 text-5xl text-light-50">欢迎使用商城后台管理系统</h1>
                    <p class="text-base text-gray-200">基于Vue3+Vite+ElementPlus+Windicss等主流技术研发</p>
                </div>
            </el-col>

            <!-- 右侧 -->
            <el-col :lg="8" :md="12" class="flex flex-col bg-light-50 items-center justify-center">
                <h2 class="font-bold text-3xl text-gray-800">欢迎回来</h2>
                <div class="flex space-x-1 my-5 text-gray-300 items-center justify-center">
                    <span class="bg-gray-200 h-[1px] w-16"></span>
                    <span>账号密码登录</span>
                    <span class="bg-gray-200 h-[1px] w-16"></span>
                </div>

                <!-- 表单 -->
                <el-form :model="form" class="w-[250px]">
                    <el-form-item>
                        <el-input v-model="form.username" placeholder="请输入用户名">
                            <!-- 使用前缀插槽插入element-plus的图标 -->
                            <template #prefix>
                                <el-icon>
                                    <User />
                                </el-icon>
                            </template>
                        </el-input>
                    </el-form-item>
                    <el-form-item>
                        <el-input v-model="form.password" placeholder="请输入密码">
                            <template #prefix>
                                <el-icon>
                                    <Lock />
                                </el-icon>
                            </template>
                        </el-input>
                    </el-form-item>
                    <el-form-item>
                        <el-button class="w-[250px]" type="primary" @click="onSubmit" color="#626aef" round>登 录
                        </el-button>
                    </el-form-item>
                </el-form>
            </el-col>
        </el-row>
    </div>
</template>

<script setup>
import { reactive } from 'vue'
const form = reactive({
    username: '',
    password: '',
})

const onSubmit = () => {
    console.log('submit!')
}
</script>
用户登录表单校验
我们实现如下功能:
用户名不能为空,用户名长度为3-36
密码不能为空,密码长度为6-72
这个时候,我们需要用到element-plus给我们提供的表单校验功能,修改pages/login.vue,完整代码如下:
<template>
    <div>
        <el-row class="min-h-screen bg-indigo-500">
            <!-- 左侧 -->
            <el-col :lg="16" :md="12" class="center">
                <div>
                    <h1 class="font-bold mb-4 text-5xl text-light-50">欢迎使用商城后台管理系统</h1>
                    <p class="text-base text-gray-200">基于Vue3+Vite+ElementPlus+Windicss等主流技术研发</p>
                </div>
            </el-col>

            <!-- 右侧 -->
            <el-col :lg="8" :md="12" class="flex-col bg-light-50  center">
                <h2 class="font-bold text-3xl text-gray-800">欢迎回来</h2>
                <div class="flex space-x-1 my-5  text-gray-300">
                    <span class="line"></span>
                    <span>账号密码登录</span>
                    <span class="line"></span>
                </div>

                <!-- 表单 -->
                <el-form ref="formRef" :model="form" :rules="rules" class="w-[250px]">
                    <el-form-item prop="username">
                        <el-input v-model="form.username" placeholder="请输入用户名">
                            <!-- 使用前缀插槽插入element-plus的图标 -->
                            <template #prefix>
                                <el-icon>
                                    <User />
                                </el-icon>
                            </template>
                        </el-input>
                    </el-form-item>
                    <el-form-item prop="password">
                        <el-input v-model="form.password" type="password" placeholder="请输入密码" show-password>
                            <template #prefix>
                                <el-icon>
                                    <Lock />
                                </el-icon>
                            </template>
                        </el-input>
                    </el-form-item>
                    <el-form-item>
                        <el-button class="w-[250px]" type="primary" @click="onSubmit" color="#626aef" round>登 录
                        </el-button>
                    </el-form-item>
                </el-form>
            </el-col>
        </el-row>
    </div>
</template>

<script setup>
import { ref, reactive } from 'vue'

// 表单引用
const formRef = ref(null)

// 表单属性
const form = reactive({
    username: '',
    password: '',
})

// 表单规则
const rules = reactive({
    username: [
        { required: true, message: '用户名不能为空', trigger: 'blur' },
        { min: 2, max: 36, message: '用户名长度为2到36', trigger: 'blur' },
    ],
    password: [
        { required: true, message: '密码不能为空', trigger: 'blur' },
        { min: 6, max: 72, message: '密码长度为6到72', trigger: 'blur' },
    ],
})

const onSubmit = () => {
    // 校验表单内容
    formRef.value.validate((valid) => {
        console.log(valid)
    })
}
</script>

<style scoped>
.line {
    @apply bg-gray-200 h-[1px] w-16;
}

.center {
    @apply flex items-center justify-center;
}
</style>
整合axios发送请求
安装:
npminstallaxios
创建utils/axios.js,对axios做一个基本的封装:
importaxiosfrom"axios";

//创建实例
constapi=axios.create({
baseURL:"/api",
});

//导出实例
exportdefaultapi;
修改vite.config.js,配置用户代理,解决跨域问题:
//https://vitejs.dev/config/
import{defineConfig}from"vite";
importvuefrom"@vitejs/plugin-vue";
importWindiCSSfrom"vite-plugin-windicss";
importpathfrom"path";

exportdefaultdefineConfig({
//配置解析模块
resolve:{
//配置别名
alias:{
"@":path.resolve(__dirname,"src"),
},
},
//服务配置
server:{
//代理
proxy:{
"/api":{
target:"http://192.168.101.2:8889/api/v1",
changeOrigin:true,
rewrite:(path)=>path.replace(/^\/api/,""),
},
},
},
plugins:[vue(),WindiCSS()],
});
创建api/auth.js,封装登录接口:
//权限管理模块相关的api接口
importapifrom"@/utils/axios";

//登录接口
exportfunctionlogin(username,password){
returnapi.post("/auth/login",{username,password});
}
修改login.vue,使用登录接口,登录并跳转到首页:
<template>
    <div>
        <el-row class="min-h-screen bg-indigo-500">
            <!-- 左侧 -->
            <el-col :lg="16" :md="12" class="center">
                <div>
                    <h1 class="font-bold mb-4 text-5xl text-light-50">欢迎使用商城后台管理系统</h1>
                    <p class="text-base text-gray-200">基于Vue3+Vite+ElementPlus+Windicss等主流技术研发</p>
                </div>
            </el-col>

            <!-- 右侧 -->
            <el-col :lg="8" :md="12" class="flex-col bg-light-50  center">
                <h2 class="font-bold text-3xl text-gray-800">欢迎回来</h2>
                <div class="flex space-x-1 my-5  text-gray-300">
                    <span class="line"></span>
                    <span>账号密码登录</span>
                    <span class="line"></span>
                </div>

                <!-- 表单 -->
                <el-form ref="formRef" :model="form" :rules="rules" class="w-[250px]">
                    <el-form-item prop="username">
                        <el-input v-model="form.username" placeholder="请输入用户名">
                            <!-- 使用前缀插槽插入element-plus的图标 -->
                            <template #prefix>
                                <el-icon>
                                    <User />
                                </el-icon>
                            </template>
                        </el-input>
                    </el-form-item>
                    <el-form-item prop="password">
                        <el-input v-model="form.password" type="password" placeholder="请输入密码" show-password>
                            <template #prefix>
                                <el-icon>
                                    <Lock />
                                </el-icon>
                            </template>
                        </el-input>
                    </el-form-item>
                    <el-form-item>
                        <el-button class="w-[250px]" type="primary" @click="onSubmit" color="#626aef" round>登 录
                        </el-button>
                    </el-form-item>
                </el-form>
            </el-col>
        </el-row>
    </div>
</template>

<script setup>
import { ref, reactive } from 'vue'
import { useRouter } from "vue-router"
import { login } from "@/api/auth"
import { ElNotification } from "element-plus"

// 路由器
const router = useRouter()

// 表单引用
const formRef = ref(null)

// 表单属性
const form = reactive({
    username: '',
    password: '',
})

// 表单规则
const rules = reactive({
    username: [
        { required: true, message: '用户名不能为空', trigger: 'blur' },
        { min: 2, max: 36, message: '用户名长度为2到36', trigger: 'blur' },
    ],
    password: [
        { required: true, message: '密码不能为空', trigger: 'blur' },
        { min: 6, max: 72, message: '密码长度为6到72', trigger: 'blur' },
    ],
})

// 点击登录按钮触发的方法
const onSubmit = () => {
    // 校验表单内容
    formRef.value.validate((valid) => {
        if (!valid) {
            return false
        }

        // 调用登录方法
        let that = this;
        login(form.username, form.password)
            .then((res) => {
                console.log(res)
                let data = res.data;
                if (data.status && data.code === 10000) {
                    console.log("登录成功")
                    ElNotification({
                        message: "登录成功",
                        type: "success",
                        duration: 3000,
                    })
                    router.push("/")
                } else {
                    ElNotification({
                        message: data.msg,
                        type: "error",
                        duration: 3000,
                    })
                }
            })
            .catch((err) => {
                console.log(err)
                ElNotification({
                    message: err.response.data.msg || "请求失败",
                    type: "error",
                    duration: 3000,
                })
            })
    })
}
</script>

<style scoped>
.line {
    @apply bg-gray-200 h-[1px] w-16;
}

.center {
    @apply flex items-center justify-center;
}
</style>
引入cookie
安装依赖:
npmi@vueuse/core
npmi@vueuse/integrations
npmiuniversal-cookie
cookie的官方使用示例如下:
<template>
  <div>
    <strong>locale</strong>: {{ cookies.get('locale') }}
    <hr>
    <pre>{{ cookies.getAll() }}</pre>
    <button @click="cookies.set('locale', 'ru-RU')">Russian</button>
    <button @click="cookies.set('locale', 'en-US')">English</button>
  </div>
</template>

<script>
  import { defineComponent } from 'vue'
  import { useCookies } from '@vueuse/integrations/useCookies'

  export default defineComponent({
    setup() {
      const cookies = useCookies(['locale'])
      return {
        cookies,
      }
    },
  })
</script>
修改pages/login.vue,我们在登录成功以后,引入cookie,使用cookie存储用户的token:
<template>
    <div>
        <el-row class="min-h-screen bg-indigo-500">
            <!-- 左侧 -->
            <el-col :lg="16" :md="12" class="center">
                <div>
                    <h1 class="font-bold mb-4 text-5xl text-light-50">欢迎使用商城后台管理系统</h1>
                    <p class="text-base text-gray-200">基于Vue3+Vite+ElementPlus+Windicss等主流技术研发</p>
                </div>
            </el-col>

            <!-- 右侧 -->
            <el-col :lg="8" :md="12" class="flex-col bg-light-50  center">
                <h2 class="font-bold text-3xl text-gray-800">欢迎回来</h2>
                <div class="flex space-x-1 my-5  text-gray-300">
                    <span class="line"></span>
                    <span>账号密码登录</span>
                    <span class="line"></span>
                </div>

                <!-- 表单 -->
                <el-form ref="formRef" :model="form" :rules="rules" class="w-[250px]">
                    <el-form-item prop="username">
                        <el-input v-model="form.username" placeholder="请输入用户名">
                            <!-- 使用前缀插槽插入element-plus的图标 -->
                            <template #prefix>
                                <el-icon>
                                    <User />
                                </el-icon>
                            </template>
                        </el-input>
                    </el-form-item>
                    <el-form-item prop="password">
                        <el-input v-model="form.password" type="password" placeholder="请输入密码" show-password>
                            <template #prefix>
                                <el-icon>
                                    <Lock />
                                </el-icon>
                            </template>
                        </el-input>
                    </el-form-item>
                    <el-form-item>
                        <el-button class="w-[250px]" type="primary" @click="onSubmit" color="#626aef" round>登 录
                        </el-button>
                    </el-form-item>
                </el-form>
            </el-col>
        </el-row>
    </div>
</template>

<script setup>
import { ref, reactive } from 'vue'
import { useRouter } from "vue-router"
import { login } from "@/api/auth"
import { ElNotification } from "element-plus"
import { useCookies } from '@vueuse/integrations/useCookies'

// cookie 缓存器
const cookie = useCookies()

// 路由器
const router = useRouter()

// 表单引用
const formRef = ref(null)

// 表单属性
const form = reactive({
    username: '',
    password: '',
})

// 表单规则
const rules = reactive({
    username: [
        { required: true, message: '用户名不能为空', trigger: 'blur' },
        { min: 2, max: 36, message: '用户名长度为2到36', trigger: 'blur' },
    ],
    password: [
        { required: true, message: '密码不能为空', trigger: 'blur' },
        { min: 6, max: 72, message: '密码长度为6到72', trigger: 'blur' },
    ],
})

// 点击登录按钮触发的方法
const onSubmit = () => {
    // 校验表单内容
    formRef.value.validate((valid) => {
        if (!valid) {
            return false
        }

        // 调用登录方法
        let that = this;
        login(form.username, form.password)
            .then((res) => {
                console.log(res)
                let data = res.data;
                if (data.status && data.code === 10000) {
                    console.log("登录成功", data)
                    ElNotification({
                        message: "登录成功",
                        type: "success",
                        duration: 3000,
                    })
                    cookie.set("shop-admin-token", data.data.token)
                    router.push("/")
                } else {
                    ElNotification({
                        message: data.msg,
                        type: "error",
                        duration: 3000,
                    })
                }
            })
            .catch((err) => {
                console.log(err)
                ElNotification({
                    message: err.response.data.msg || "请求失败",
                    type: "error",
                    duration: 3000,
                })
            })
    })
}
</script>

<style scoped>
.line {
    @apply bg-gray-200 h-[1px] w-16;
}

.center {
    @apply flex items-center justify-center;
}
</style>
配置Axios拦截器
我们可以通过配置Axios拦截器的方式,在请求的前后添加统一的处理逻辑,比如错误处理,请求头添加等。
修改utils/axios.js,添加拦截器:
importaxiosfrom"axios";
import{ElNotification}from"element-plus";
import{useCookies}from"@vueuse/integrations/useCookies";

//创建实例
constapi=axios.create({
baseURL:"/api",
});

//请求拦截器
api.interceptors.request.use(
//拦截配置
function(config){
//自动添加cookie
constcookie=useCookies();
consttoken=cookie.get("shop-admin-token");
if(token){
config.headers["zdppy-auth-token"]=token;
}
returnconfig;
},

//拦截错误
function(error){
returnPromise.reject(error);
}
);
//响应拦截器
api.interceptors.response.use(
//拦截成功
function(response){
console.log("拦截成功:",response);
letdata=response.data;
if(data.status&&data.code===10000){
returndata.data;
}else{
ElNotification({
message:data.msg,
type:"error",
duration:3000,
});
returnPromise.reject(response);
}
},

//拦截失败
function(error){
returnPromise.reject(error);
}
);

//导出实例
exportdefaultapi;
修改pages/login.vue,简化登录请求的处理逻辑:
<template>
    <div>
        <el-row class="min-h-screen bg-indigo-500">
            <!-- 左侧 -->
            <el-col :lg="16" :md="12" class="center">
                <div>
                    <h1 class="font-bold mb-4 text-5xl text-light-50">欢迎使用商城后台管理系统</h1>
                    <p class="text-base text-gray-200">基于Vue3+Vite+ElementPlus+Windicss等主流技术研发</p>
                </div>
            </el-col>

            <!-- 右侧 -->
            <el-col :lg="8" :md="12" class="flex-col bg-light-50  center">
                <h2 class="font-bold text-3xl text-gray-800">欢迎回来</h2>
                <div class="flex space-x-1 my-5  text-gray-300">
                    <span class="line"></span>
                    <span>账号密码登录</span>
                    <span class="line"></span>
                </div>

                <!-- 表单 -->
                <el-form ref="formRef" :model="form" :rules="rules" class="w-[250px]">
                    <el-form-item prop="username">
                        <el-input v-model="form.username" placeholder="请输入用户名">
                            <!-- 使用前缀插槽插入element-plus的图标 -->
                            <template #prefix>
                                <el-icon>
                                    <User />
                                </el-icon>
                            </template>
                        </el-input>
                    </el-form-item>
                    <el-form-item prop="password">
                        <el-input v-model="form.password" type="password" placeholder="请输入密码" show-password>
                            <template #prefix>
                                <el-icon>
                                    <Lock />
                                </el-icon>
                            </template>
                        </el-input>
                    </el-form-item>
                    <el-form-item>
                        <el-button class="w-[250px]" type="primary" @click="onSubmit" color="#626aef"
                            :loading="loginBtnLoading" round>登 录
                        </el-button>
                    </el-form-item>
                </el-form>
            </el-col>
        </el-row>
    </div>
</template>

<script setup>
import { ref, reactive } from 'vue'
import { useRouter } from "vue-router"
import { login } from "@/api/auth"
import { ElNotification } from "element-plus"
import { useCookies } from '@vueuse/integrations/useCookies'

// cookie 缓存器
const cookie = useCookies()

// 路由器
const router = useRouter()

// 表单引用
const formRef = ref(null)

// 登录按钮加载状态
const loginBtnLoading = ref(false)

// 表单属性
const form = reactive({
    username: '',
    password: '',
})

// 表单规则
const rules = reactive({
    username: [
        { required: true, message: '用户名不能为空', trigger: 'blur' },
        { min: 2, max: 36, message: '用户名长度为2到36', trigger: 'blur' },
    ],
    password: [
        { required: true, message: '密码不能为空', trigger: 'blur' },
        { min: 6, max: 72, message: '密码长度为6到72', trigger: 'blur' },
    ],
})

// 点击登录按钮触发的方法
const onSubmit = () => {

    // 校验表单内容
    formRef.value.validate((valid) => {
        if (!valid) {
            return false;
        }
        loginBtnLoading.value = true;

        // 调用登录方法
        login(form.username, form.password)
            .then((data) => {
                console.log("登录成功", data)
                ElNotification({
                    message: "登录成功",
                    type: "success",
                    duration: 3000,
                })
                cookie.set("shop-admin-token", data.token)
                router.push("/")
            })
            .finally(() => {
                loginBtnLoading.value = false;
            })
    })
}
</script>

<style scoped>
.line {
    @apply bg-gray-200 h-[1px] w-16;
}

.center {
    @apply flex items-center justify-center;
}
</style>
常用工具库封装
封装cookie操作工具库:utils/cookie.js
import{useCookies}from"@vueuse/integrations/useCookies";

consttokenKey="zdppy-auth-token";
constcookie=useCookies();

//获取token
exportfunctiongetToken(){
returncookie.get(tokenKey);
}

//设置token
exportfunctionsetToken(token){
returncookie.set(tokenKey,token);
}

//清除token
exportfunctionremoveToken(){
returncookie.remove(tokenKey);
}
封装消息提示工具库:utils/message.js
import{ElNotification}from"element-plus";

//提示信息
exportfunctiontoast(message,type="success",isHtml=false){
ElNotification({
message,
type,
dangerouslyUseHTMLString:isHtml,//是否作为HTML片段处理
duration:3000,
});
}
修改pages/login.vue,使用工具库简化代码:
<template>
    <div>
        <el-row class="min-h-screen bg-indigo-500">
            <!-- 左侧 -->
            <el-col :lg="16" :md="12" class="center">
                <div>
                    <h1 class="font-bold mb-4 text-5xl text-light-50">欢迎使用商城后台管理系统</h1>
                    <p class="text-base text-gray-200">基于Vue3+Vite+ElementPlus+Windicss等主流技术研发</p>
                </div>
            </el-col>

            <!-- 右侧 -->
            <el-col :lg="8" :md="12" class="flex-col bg-light-50  center">
                <h2 class="font-bold text-3xl text-gray-800">欢迎回来</h2>
                <div class="flex space-x-1 my-5  text-gray-300">
                    <span class="line"></span>
                    <span>账号密码登录</span>
                    <span class="line"></span>
                </div>

                <!-- 表单 -->
                <el-form ref="formRef" :model="form" :rules="rules" class="w-[250px]">
                    <el-form-item prop="username">
                        <el-input v-model="form.username" placeholder="请输入用户名">
                            <!-- 使用前缀插槽插入element-plus的图标 -->
                            <template #prefix>
                                <el-icon>
                                    <User />
                                </el-icon>
                            </template>
                        </el-input>
                    </el-form-item>
                    <el-form-item prop="password">
                        <el-input v-model="form.password" type="password" placeholder="请输入密码" show-password>
                            <template #prefix>
                                <el-icon>
                                    <Lock />
                                </el-icon>
                            </template>
                        </el-input>
                    </el-form-item>
                    <el-form-item>
                        <el-button class="w-[250px]" type="primary" @click="onSubmit" color="#626aef"
                            :loading="loginBtnLoading" round>登 录
                        </el-button>
                    </el-form-item>
                </el-form>
            </el-col>
        </el-row>
    </div>
</template>

<script setup>
import { ref, reactive } from 'vue'
import { useRouter } from "vue-router"
import { login } from "@/api/auth"
import { ElNotification } from "element-plus"
import { setToken } from "@/utils/cookie"
import { toast } from "@/utils/message"

// 路由器
const router = useRouter()

// 表单引用
const formRef = ref(null)

// 登录按钮加载状态
const loginBtnLoading = ref(false)

// 表单属性
const form = reactive({
    username: '',
    password: '',
})

// 表单规则
const rules = reactive({
    username: [
        { required: true, message: '用户名不能为空', trigger: 'blur' },
        { min: 2, max: 36, message: '用户名长度为2到36', trigger: 'blur' },
    ],
    password: [
        { required: true, message: '密码不能为空', trigger: 'blur' },
        { min: 6, max: 72, message: '密码长度为6到72', trigger: 'blur' },
    ],
})

// 点击登录按钮触发的方法
const onSubmit = () => {

    // 校验表单内容
    formRef.value.validate((valid) => {
        if (!valid) {
            return false;
        }
        loginBtnLoading.value = true;

        // 调用登录方法
        login(form.username, form.password)
            .then((data) => {
                console.log("登录成功", data)
                toast("登录成功")
                setToken(data.token)
                router.push("/")
            })
            .finally(() => {
                loginBtnLoading.value = false;
            })
    })
}
</script>

<style scoped>
.line {
    @apply bg-gray-200 h-[1px] w-16;
}

.center {
    @apply flex items-center justify-center;
}
</style>
修改utils/axios.js,使用工具库简化代码:
importaxiosfrom"axios";
import{getToken}from"./cookie";
import{toast}from"./message";

//创建实例
constapi=axios.create({
baseURL:"/api",
});

//请求拦截器
api.interceptors.request.use(
//拦截配置
function(config){
//自动添加token
config.headers["zdppy-auth-token"]=getToken()||"";
returnconfig;
},

//拦截错误
function(error){
returnPromise.reject(error);
}
);
//响应拦截器
api.interceptors.response.use(
//拦截成功
function(response){
console.log("拦截成功:",response);
letdata=response.data;
if(data.status&&data.code===10000){
returndata.data;
}else{
toast(data.msg,"error");
returnPromise.reject(response);
}
},

//拦截失败
function(error){
returnPromise.reject(error);
}
);

//导出实例
exportdefaultapi;
使用vuex管理用户信息
安装:
npminstallvuex@next--save
创建store/index.js,提供基本的状态管理器:
import{createStore}from"vuex";

//创建一个新的store实例
conststore=createStore({
state(){
return{
//用户信息
user:{},
};
},
mutations:{
//记录用户信息
setUserinfo(state,user){
state.user=user;
},
},
});

exportdefaultstore;
修改main.js,引入vuex并使用:
import{createApp}from"vue";
importAppfrom"./App.vue";
importElementPlusfrom"element-plus";
import"element-plus/dist/index.css";
importrouterfrom"./router";
importstorefrom"./store";
import*asElementPlusIconsVuefrom"@element-plus/icons-vue";

constapp=createApp(App);

app.use(router);
app.use(store);
app.use(ElementPlus);

//引入element-plus的图标
for(const[key,component]ofObject.entries(ElementPlusIconsVue)){
app.component(key,component);
}

//注意,位置不是在顶部
import"virtual:windi.css";

app.mount("#app");
修改pages/login.vue,在登录成功以后,记录用户基本信息:
<template>
<div>
<el-rowclass="min-h-screenbg-indigo-500">
<!--左侧-->
<el-col:lg="16":md="12"class="center">
<div>
<h1class="font-boldmb-4text-5xltext-light-50">欢迎使用商城后台管理系统</h1>
<pclass="text-basetext-gray-200">基于Vue3+Vite+ElementPlus+Windicss等主流技术研发</p>
</div>
</el-col>

<!--右侧-->
<el-col:lg="8":md="12"class="flex-colbg-light-50center">
<h2class="font-boldtext-3xltext-gray-800">欢迎回来</h2>
<divclass="flexspace-x-1my-5text-gray-300">
<spanclass="line"></span>
<span>账号密码登录</span>
<spanclass="line"></span>
</div>

<!--表单-->
<el-formref="formRef":model="form":rules="rules"class="w-[250px]">
<el-form-itemprop="username">
<el-inputv-model="form.username"placeholder="请输入用户名">
<!--使用前缀插槽插入element-plus的图标-->
<template#prefix>
<el-icon>
<User/>
</el-icon>
</template>
</el-input>
</el-form-item>
<el-form-itemprop="password">
<el-inputv-model="form.password"type="password"placeholder="请输入密码"show-password>
<template#prefix>
<el-icon>
<Lock/>
</el-icon>
</template>
</el-input>
</el-form-item>
<el-form-item>
<el-buttonclass="w-[250px]"type="primary"@click="onSubmit"color="#626aef"
:loading="loginBtnLoading"round>登录
</el-button>
</el-form-item>
</el-form>
</el-col>
</el-row>
</div>
</template>

<scriptsetup>
import{ref,reactive}from'vue'
import{useRouter}from"vue-router"
import{useStore}from"vuex"
import{login}from"@/api/auth"
import{setToken}from"@/utils/cookie"
import{toast}from"@/utils/message"

//路由器
constrouter=useRouter()
//状态管理器
conststore=useStore()

//表单引用
constformRef=ref(null)

//登录按钮加载状态
constloginBtnLoading=ref(false)

//表单属性
constform=reactive({
username:'',
password:'',
})

//表单规则
construles=reactive({
username:[
{required:true,message:'用户名不能为空',trigger:'blur'},
{min:2,max:36,message:'用户名长度为2到36',trigger:'blur'},
],
password:[
{required:true,message:'密码不能为空',trigger:'blur'},
{min:6,max:72,message:'密码长度为6到72',trigger:'blur'},
],
})

//点击登录按钮触发的方法
constonSubmit=()=>{

//校验表单内容
formRef.value.validate((valid)=>{
if(!valid){
returnfalse;
}
loginBtnLoading.value=true;

//调用登录方法
login(form.username,form.password)
.then((data)=>{
store.commit("setUserinfo",{id:data.id,username:data.username})
toast("登录成功")
setToken(data.token)
router.push("/")
})
.finally(()=>{
loginBtnLoading.value=false;
})
})
}
</script>

<stylescoped>
.line{
@applybg-gray-200h-[1px]w-16;
}

.center{
@applyflexitems-centerjustify-center;
}
</style>
修改index.vue,访问状态管理器中的用户信息:
<template>
    <div>
        后台首页
        <h1>欢迎您:{{ $store.state.user }}</h1>
    </div>
</template>
<script setup>
</script>
登录权限校验
需求:如果用户未登录,我们则让其跳转到登录页面,如果已登录,但是又访问了登录页面,则直接跳转到首页或者原来的页面。
创建utils/permission.js,作为权限库:
importrouterfrom"@/router";
import{getToken}from"./cookie";
import{toast}from"./message";

//全局前置守卫
router.beforeEach((to,from,next)=>{
console.log("全局前置守卫:",to,from);

//如果没有登录,就跳转到登录页面
consttoken=getToken();
if(!token&&to.path!="/login"){
toast("请先登录","error");
returnnext({path:"/login"});
}

//防止重复登录
if(token&&to.path=="/login"){
toast("您已经登录过","warning");
returnnext({path:from.path?from.path:"/"});
}

next();
});
在main.js中引入使用即可:
import{createApp}from"vue";
importAppfrom"./App.vue";
importElementPlusfrom"element-plus";
import"element-plus/dist/index.css";
importrouterfrom"./router";
importstorefrom"./store";
import*asElementPlusIconsVuefrom"@element-plus/icons-vue";

constapp=createApp(App);

app.use(router);
app.use(store);
app.use(ElementPlus);

//引入element-plus的图标
for(const[key,component]ofObject.entries(ElementPlusIconsVue)){
app.component(key,component);
}

//注意,位置不是在顶部
import"virtual:windi.css";
import"@/utils/permission";

app.mount("#app");
完善登录功能
需求:
1、用户登录以后,获取用户信息
2、刷新页面以后,用户信息不会丢失
3、按Enter键的时候,触发登录方法
修改api/auth.js,添加获取用户信息的接口:
//权限管理模块相关的api接口
importapifrom"@/utils/axios";

//登录接口
exportfunctionlogin(username,password){
returnapi.post("/auth/login",{username,password});
}

//获取用户信息接口
exportfunctiongetUserinfo(){
returnapi.get("/auth/userinfo");
}
修改store/index.js,封装用户登录和获取用户信息的action:
import{createStore}from"vuex";
import{login,getUserinfo}from"@/api/auth";
import{setToken}from"@/utils/cookie";

//创建一个新的store实例
conststore=createStore({
state(){
return{
//用户信息
user:{},
};
},
mutations:{
//记录用户信息
setUserinfo(state,user){
state.user=user;
},
},
actions:{
//登录
storeLogin({commit},{username,password}){
returnnewPromise((resolve,reject)=>{
login(username,password)
.then((data)=>{
setToken(data.token);
resolve(data);
})
.catch((err)=>reject(err));
});
},
//获取用户信息
storeGetUserinfo({commit}){
returnnewPromise((resolve,reject)=>{
getUserinfo()
.then((data)=>{
commit("setUserinfo",data);
resolve(data);
})
.catch((err)=>reject(err));
});
},
},
});

exportdefaultstore;
修改utils/permission.js,如果用户已登录,自动获取用户信息:
importrouterfrom"@/router";
importstorefrom"@/store";
import{getToken}from"./cookie";
import{toast}from"./message";

//全局前置守卫
router.beforeEach(async(to,from,next)=>{
console.log("全局前置守卫:",to,from);

//如果没有登录,就跳转到登录页面
consttoken=getToken();
if(!token&&to.path!="/login"){
toast("请先登录","error");
returnnext({path:"/login"});
}

//防止重复登录
if(token&&to.path=="/login"){
toast("您已经登录过","warning");
returnnext({path:from.path?from.path:"/"});
}

//如果用户登录了,就自动获取用户信息并存储在vuex中
if(token){
awaitstore.dispatch("storeGetUserinfo");
}

//路由继续前行
next();
});
修改pages/login.vue,优化登录相关的逻辑:
<template>
    <div>
        <el-row class="min-h-screen bg-indigo-500">
            <!-- 左侧 -->
            <el-col :lg="16" :md="12" class="center">
                <div>
                    <h1 class="font-bold mb-4 text-5xl text-light-50">欢迎使用商城后台管理系统</h1>
                    <p class="text-base text-gray-200">基于Vue3+Vite+ElementPlus+Windicss等主流技术研发</p>
                </div>
            </el-col>

            <!-- 右侧 -->
            <el-col :lg="8" :md="12" class="flex-col bg-light-50  center">
                <h2 class="font-bold text-3xl text-gray-800">欢迎回来</h2>
                <div class="flex space-x-1 my-5  text-gray-300">
                    <span class="line"></span>
                    <span>账号密码登录</span>
                    <span class="line"></span>
                </div>

                <!-- 表单 -->
                <el-form ref="formRef" :model="form" :rules="rules" class="w-[250px]">
                    <el-form-item prop="username">
                        <el-input v-model="form.username" placeholder="请输入用户名">
                            <!-- 使用前缀插槽插入element-plus的图标 -->
                            <template #prefix>
                                <el-icon>
                                    <User />
                                </el-icon>
                            </template>
                        </el-input>
                    </el-form-item>
                    <el-form-item prop="password">
                        <el-input v-model="form.password" type="password" placeholder="请输入密码" show-password>
                            <template #prefix>
                                <el-icon>
                                    <Lock />
                                </el-icon>
                            </template>
                        </el-input>
                    </el-form-item>
                    <el-form-item>
                        <el-button class="w-[250px]" type="primary" @click="onSubmit" color="#626aef"
                            :loading="loginBtnLoading" round>登 录
                        </el-button>
                    </el-form-item>
                </el-form>
            </el-col>
        </el-row>
    </div>
</template>

<script setup>
import { ref, reactive, onMounted, onBeforeMount } from 'vue'
import { useRouter } from "vue-router"
import { useStore } from "vuex"
import { toast } from "@/utils/message"

// 路由器
const router = useRouter()
// 状态管理器
const store = useStore()

// 表单引用
const formRef = ref(null)

// 登录按钮加载状态
const loginBtnLoading = ref(false)

// 表单属性
const form = reactive({
    username: '',
    password: '',
})

// 表单规则
const rules = reactive({
    username: [
        { required: true, message: '用户名不能为空', trigger: 'blur' },
        { min: 2, max: 36, message: '用户名长度为2到36', trigger: 'blur' },
    ],
    password: [
        { required: true, message: '密码不能为空', trigger: 'blur' },
        { min: 6, max: 72, message: '密码长度为6到72', trigger: 'blur' },
    ],
})

// 点击登录按钮触发的方法
const onSubmit = () => {

    // 校验表单内容
    formRef.value.validate((valid) => {
        if (!valid) {
            return false;
        }
        loginBtnLoading.value = true;

        // 使用vuex的axtions简化登录逻辑
        store.dispatch("storeLogin", form)
            .then((data) => {
                toast("登录成功")
                router.push("/")
            })
            .finally(() => {
                loginBtnLoading.value = false;
            })
    })
}

// 监听回车事件
function onKeyUp(e) {
    if (e.key === "Enter") onSubmit()
}

// 添加键盘监听
onMounted(() => {
    document.addEventListener("keyup", onKeyUp)
})

// 移除键盘监听
onBeforeMount(() => {
    document.removeEventListener("keyup", onKeyUp)
})

</script>

<style scoped>
.line {
    @apply bg-gray-200 h-[1px] w-16;
}

.center {
    @apply flex items-center justify-center;
}
</style>
实现退出登录的功能
修改api/auth.js,封装请求后端注销接口的方法:
//权限管理模块相关的api接口
importapifrom"@/utils/axios";

//登录接口
exportfunctionlogin(username,password){
returnapi.post("/auth/login",{username,password});
}

//获取用户信息接口
exportfunctiongetUserinfo(){
returnapi.get("/auth/userinfo");
}

//注销接口
exportfunctionlogout(){
returnapi.put("/auth/logout");
}
修改store/index.js,封装一个退出登录的action:
import{createStore}from"vuex";
import{login,getUserinfo}from"@/api/auth";
import{setToken,removeToken}from"@/utils/cookie";

//创建一个新的store实例
conststore=createStore({
state(){
return{
//用户信息
user:{},
};
},
mutations:{
//记录用户信息
setUserinfo(state,user){
state.user=user;
},
},
actions:{
//登录
storeLogin({commit},{username,password}){
returnnewPromise((resolve,reject)=>{
login(username,password)
.then((data)=>{
setToken(data.token);
resolve(data);
})
.catch((err)=>reject(err));
});
},
//获取用户信息
storeGetUserinfo({commit}){
returnnewPromise((resolve,reject)=>{
getUserinfo()
.then((data)=>{
commit("setUserinfo",data);
resolve(data);
})
.catch((err)=>reject(err));
});
},
//退出登录
storeLogout({commit}){
removeToken();
commit("setUserinfo",{});
},
},
});

exportdefaultstore;
修改index.vue,我们简单的实现退出登录的逻辑:
<template>
    <div>
        后台首页
        <h1>欢迎您:{{ $store.state.user }}</h1>
        <el-button @click="handleLogout">退出登录</el-button>
    </div>
</template>
<script setup>
import { confirm, toast } from '@/utils/message';
import { logout } from "@/api/auth"
import { useRouter } from "vue-router"
import { useStore } from "vuex"

const router = useRouter()
const store = useStore()

function handleLogout() {
    console.log("注销")
    confirm("是否要退出登录?").then(r => {
        console.log("确认:", r);
        logout()
            .finally(() => {
                store.dispatch("storeLogout")
                toast("退出登录成功")
                router.push("/login")
            })
    })
}
</script>
全局loading进度条实现
安装依赖:
npminprogress
在main.js中引入样式:
import{createApp}from"vue";
importAppfrom"./App.vue";
importElementPlusfrom"element-plus";
import"element-plus/dist/index.css";
importrouterfrom"./router";
importstorefrom"./store";
import*asElementPlusIconsVuefrom"@element-plus/icons-vue";

constapp=createApp(App);

app.use(router);
app.use(store);
app.use(ElementPlus);

//引入element-plus的图标
for(const[key,component]ofObject.entries(ElementPlusIconsVue)){
app.component(key,component);
}

//注意,位置不是在顶部
import"virtual:windi.css";
import"@/utils/permission";
import"nprogress/nprogress.css";

app.mount("#app");
在App.vue中修改进度条颜色:
<script setup></script>

<template>
  <div>
    <router-view></router-view>
  </div>
</template>

<style>
/* 全局进度条颜色 */
#nprogress .bar {
  background-color: #f4f4f4 !important;
  height: 3px !important;
}
</style>
在utils/message.js中封装动画方法:
import{ElNotification,ElMessageBox}from"element-plus";
importnprogressfrom"nprogress";

//提示信息
exportfunctiontoast(message,type="success",isHtml=false){
ElNotification({
message,
type,
dangerouslyUseHTMLString:isHtml,//是否作为HTML片段处理
duration:3000,
});
}

//弹出确认框
exportfunctionconfirm(content="提示内容",type="warning",title=""){
returnElMessageBox.confirm(content,title,{
confirmButtonText:"确认",
cancelButtonText:"取消",
type,
});
}

//显示全屏loading
exportfunctionshowFullLoading(){
nprogress.start();
}

//隐藏全屏loading
exportfunctionhideFullLoading(){
nprogress.done();
}
在utils/permission.js中配置动画,在每个路由开始之前加载动画,每个路由结束以后结束动画:
importrouterfrom"@/router";
importstorefrom"@/store";
import{getToken}from"./cookie";
import{toast,showFullLoading,hideFullLoading}from"./message";

//全局前置守卫
router.beforeEach(async(to,from,next)=>{
//显示全屏加载动画
showFullLoading();

//如果没有登录,就跳转到登录页面
consttoken=getToken();
if(!token&&to.path!="/login"){
toast("请先登录","error");
returnnext({path:"/login"});
}

//防止重复登录
if(token&&to.path=="/login"){
toast("您已经登录过","warning");
returnnext({path:from.path?from.path:"/"});
}

//如果用户登录了,就自动获取用户信息并存储在vuex中
if(token){
awaitstore.dispatch("storeGetUserinfo");
}

//路由继续前行
next();
});

//全局后置守卫
router.afterEach((to,from)=>{
//隐藏全屏加载动画
hideFullLoading();
});
实现动态页面标题
修改router/index.js,给每个路由都设置一个title:
//引入依赖
import{createRouter,createWebHashHistory}from"vue-router";
//引入页面
importIndexfrom"@/pages/index.vue";
importNotFoundfrom"@/pages/404.vue";
importLoginfrom"@/pages/login.vue";

//路由数组
constroutes=[
//首页
{path:"/",name:"Index",component:Index,meta:{title:"后台首页"}},
//404错误页面
{
path:"/:pathMatch(.*)*",
name:"NotFound",
component:NotFound,
meta:{title:"404"},
},
//登录页面
{
path:"/login",
name:"Login",
component:Login,
meta:{title:"后台登录页"},
},
];

//创建路由
constrouter=createRouter({
history:createWebHashHistory(),
routes,
});

//导出路由
exportdefaultrouter;
修改utils/permission.js,在每个路由跳转之前设置文档的标题:
importrouterfrom"@/router";
importstorefrom"@/store";
import{getToken}from"./cookie";
import{toast,showFullLoading,hideFullLoading}from"./message";

//全局前置守卫
router.beforeEach(async(to,from,next)=>{
//显示全屏加载动画
showFullLoading();

//如果没有登录,就跳转到登录页面
consttoken=getToken();
if(!token&&to.path!="/login"){
toast("请先登录","error");
returnnext({path:"/login"});
}

//防止重复登录
if(token&&to.path=="/login"){
toast("您已经登录过","warning");
returnnext({path:from.path?from.path:"/"});
}

//如果用户登录了,就自动获取用户信息并存储在vuex中
if(token){
awaitstore.dispatch("storeGetUserinfo");
}

//设置页面的标题
lettitle=(to.meta.title?to.meta.title:"")+"-企业级商城后台管理系统";
document.title=title;

//路由继续前行
next();
});

//全局后置守卫
router.afterEach((to,from)=>{
//隐藏全屏加载动画
hideFullLoading();
});
结语
以上就是今天要分享的全部内容了。
今天的内容真的特别多,一共7000多个字,整了非常长的时间。但是今天的内容都是和登录相关的,所以也没有将文章拆分成好几篇发出来,给大家水文字。希望大家看得开心,学得过瘾。
如果大家想要今天的完整代码,只需要打赏20元以上,然后留言评论"已打赏"即可获取哈~
作为一个程序员,光会后端其实是不够的,前端,算法这些最好都能够掌握一些,特别是要精通各种算法,熟悉各种架构。前端更新非常快,要深入掌握很难,但是至少应该是当你想要自己做一个项目的时候,能够自己把页面写出来。
所以,除了学习算法和后端架构,我偶尔也会学习一些前端知识,当然我也很乐意将自己学到的东西分享给大家。
希望大家多多支持,谢谢~